
Woocommerce FAQ
Table of content
┬Ā
- Product Type
- Simple Product
ŌØÅ┬Ā┬Ā┬Ā┬Ā┬Ā Adding product
ŌØÅ┬Ā┬Ā┬Ā┬Ā┬Ā Product Data
ŌØÅ┬Ā┬Ā┬Ā┬Ā┬Ā General Setting
ŌØÅ┬Ā┬Ā┬Ā┬Ā┬Ā Inventory Setting
ŌØÅ┬Ā┬Ā┬Ā┬Ā┬Ā Shipping Setting
ŌØÅ┬Ā┬Ā┬Ā┬Ā┬Ā Product Description
- Variable Product
ŌØÅ┬Ā┬Ā┬Ā┬Ā┬Ā Adding product
ŌØÅ┬Ā┬Ā┬Ā┬Ā┬Ā Set variable product
ŌØÅ┬Ā┬Ā┬Ā┬Ā┬Ā Add Attributes
ŌØÅ┬Ā┬Ā┬Ā┬Ā┬Ā Adding variation
ŌØÅ┬Ā┬Ā┬Ā┬Ā┬Ā General Setting
ŌØÅ┬Ā┬Ā┬Ā┬Ā┬Ā Inventory
4.┬Ā┬Ā┬Ā┬Ā Product Categories, Tags and Attribute
ŌØÅ┬Ā┬Ā┬Ā┬Ā┬Ā Add/ edit product categories
ŌØÅ┬Ā┬Ā┬Ā┬Ā┬Ā Arrange product image
- Related Product
ŌØÅ┬Ā┬Ā┬Ā┬Ā┬Ā Upsell
ŌØÅ┬Ā┬Ā┬Ā┬Ā┬Ā Cross Sell
ŌØÅ┬Ā┬Ā┬Ā┬Ā┬Ā Related product
- Import / Export Product
- Managing Orders
ŌØÅ┬Ā┬Ā┬Ā┬Ā┬Ā Order status
ŌØÅ┬Ā┬Ā┬Ā┬Ā┬Ā Order Overview
ŌØÅ┬Ā┬Ā┬Ā┬Ā┬Ā Order action
ŌØÅ┬Ā┬Ā┬Ā┬Ā┬Ā View & Editing orders
ŌØÅ┬Ā┬Ā┬Ā┬Ā┬Ā Custom Field
ŌØÅ┬Ā┬Ā┬Ā┬Ā┬Ā Order Notes
- Reports
ŌØÅ┬Ā┬Ā┬Ā┬Ā┬Ā Orders
ŌØÅ┬Ā┬Ā┬Ā┬Ā┬Ā Customers
ŌØÅ┬Ā┬Ā┬Ā┬Ā┬Ā Stocks
ŌØÅ┬Ā┬Ā┬Ā┬Ā┬Ā Export Reports
┬Ā
Product Types
With attributes and categories set up and stock management configured, we can begin adding products. When adding a product, the first thing to decide is what type of product it is.
ŌŚÅ┬Ā┬Ā┬Ā┬Ā┬Ā┬Ā Simple ŌĆō covers the vast majority of any products you may sell. Simple products are shipped and have no options. For example, a book.
ŌŚÅ┬Ā┬Ā┬Ā┬Ā┬Ā┬Ā Grouped ŌĆō a collection of related products that can be purchased individually and only consist of simple products. For example, a set of six drinking glasses.
ŌŚÅ┬Ā┬Ā┬Ā┬Ā┬Ā┬Ā Virtual ŌĆō one that doesnŌĆÖt require shipping. For example, a service. Enabling this, disables all shipping related fields such as shipping dimensions. A virtual product will also not trigger the shipping calculator in cart and checkout.
ŌŚÅ┬Ā┬Ā┬Ā┬Ā┬Ā┬Ā Downloadable ŌĆō activates additional fields where you can provide a downloadable file. After a successful purchase, customers are given a downloadable file as a link in the order notification email. This is suitable, for example, for a digital album, PDF magazine, or photo.
ŌŚÅ┬Ā┬Ā┬Ā┬Ā┬Ā┬Ā External or Affiliate ŌĆō one that you list and describe on your website but is sold elsewhere.
ŌŚÅ┬Ā┬Ā┬Ā┬Ā┬Ā┬Ā Variable ŌĆō a product with variations, each of which may have a different SKU, price, stock option, etc. For example, a t-shirt available in different colors and/or sizes.
ŌŚÅ┬Ā┬Ā┬Ā┬Ā┬Ā┬Ā Other types are often added by extensions. For example, WooCommerce Subscriptions adds new product types as does WooCommerce Bookings.
┬Āimple product
┬Ā
1.┬Ā┬Ā┬Ā┬Ā Go to WooCommerce > Products > Add Product. You then have a familiar interface and should immediately feel at home.
2.┬Ā┬Ā┬Ā┬Ā Enter a product Title and Description.
3.┬Ā┬Ā┬Ā┬Ā Go to the Product Data panel, and select downloadable (digital) or virtual (service) if applicable.
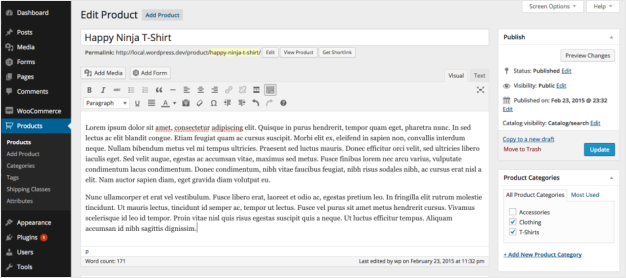
Note: Virtual products donŌĆÖt require shipping ŌĆö an order with virtual products wonŌĆÖt calculate shipping costs.
┬Ā
┬Ā
Product data
The Product Data meta box is where the majority of important data is added for your products.
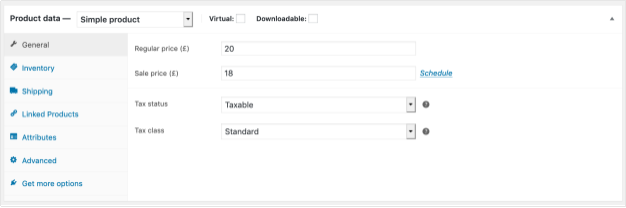
General section
ŌŚÅ┬Ā┬Ā┬Ā┬Ā┬Ā┬Ā Price
ŌŚŗ┬Ā┬Ā┬Ā┬Ā┬Ā┬Ā Regular Price ŌĆō ItemŌĆÖs normal/regular price
ŌŚŗ┬Ā┬Ā┬Ā┬Ā┬Ā┬Ā Sale Price ŌĆō ItemŌĆÖs discounted price that can then be scheduled for certain date ranges. The sale expires at 11:59pm of the specified end date
ŌŚÅ┬Ā┬Ā┬Ā┬Ā┬Ā┬Ā Tax
ŌŚŗ┬Ā┬Ā┬Ā┬Ā┬Ā┬Ā Tax status ŌĆō Taxable / Shipping only / None
ŌŚŗ┬Ā┬Ā┬Ā┬Ā┬Ā┬Ā Tax class ŌĆō Choose which tax class should be applied
┬Ā
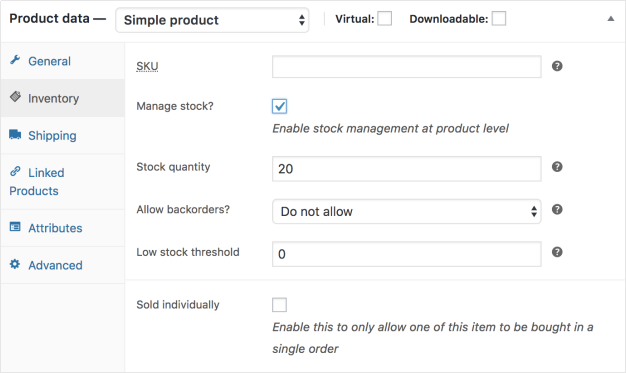
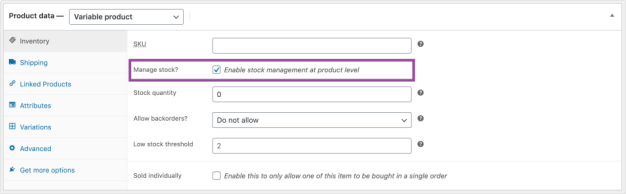
Inventory section
The inventory section allows you to manage stock for the product individually and define whether to allow back orders and more. It enables you to sell products and allow customers to add them to the cart to buy.
Enable Stock Management must be selected in Products Inventory Settings; otherwise, only the ŌĆśStock statusŌĆÖ option is visible in the Product Data Inventory box.
Options when stock management at product level is disabled. You are responsible for updating the Stock Status.

Options when stock management at product level is enabled.
ŌŚÅ┬Ā┬Ā┬Ā┬Ā┬Ā┬Ā Enter the Stock Quantity, and WooCommerce auto-manages inventory and auto-updatesStock Status as Stock, Out of Stock or On Backorder.
ŌŚÅ┬Ā┬Ā┬Ā┬Ā┬Ā┬Ā Select whether to Allow Backorders.
ŌŚÅ┬Ā┬Ā┬Ā┬Ā┬Ā┬Ā Low stock threshold ŌĆō Enter a number upon which you are notified.
ŌŚÅ┬Ā┬Ā┬Ā┬Ā┬Ā┬Ā Tick the Sold Individually box to limit the product to one per order.
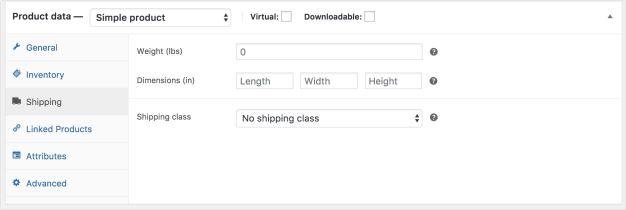
Shipping section
ŌŚÅ┬Ā┬Ā┬Ā┬Ā┬Ā┬Ā Weight ŌĆō Weight of the item.
ŌŚÅ┬Ā┬Ā┬Ā┬Ā┬Ā┬Ā Dimensions ŌĆō Length, width and height for the item.
ŌŚÅ┬Ā┬Ā┬Ā┬Ā┬Ā┬Ā Shipping Class ŌĆō Shipping classes are used by certain shipping methods to group similar products.
Linked Products section
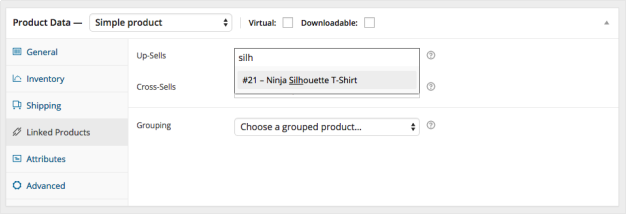
Using up-sells and cross-sells, you can cross promote your products. They can be added by searching for a particular product and selecting the product from the dropdown list:
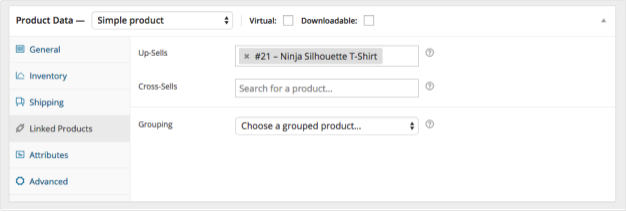
After adding, they are listed in the input field:
┬Ā
Product short description
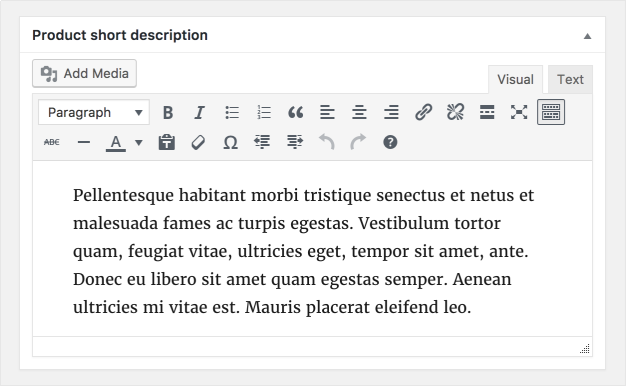
Add an excerpt. This typically appears next to product imagery on the listing page, and the long description appears in the Product Description tab.
┬Ā
Variable Product
Variable products are a product type in WooCommerce that lets you offer a set of variations on a product, with control over prices, stock, image and more for each variation. They can be used for a product like a shirt, where you can offer a large, medium and small and in different colors.
Adding a Variable Product
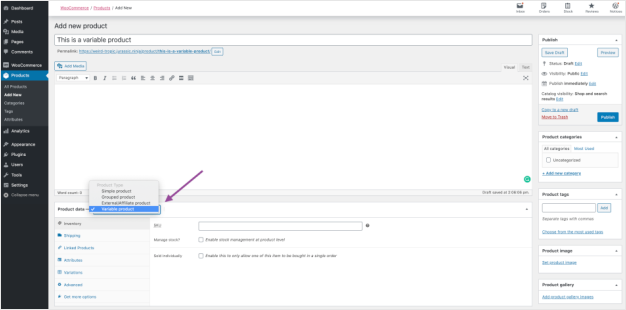
Step 1. Set the Product Type
To add a variable product, create a new product or edit an existing one.
1.┬Ā┬Ā┬Ā┬Ā Go to: WooCommerce > Products.
2.┬Ā┬Ā┬Ā┬Ā Select the Add Product button or Edit an existing product. The Product Data displays.
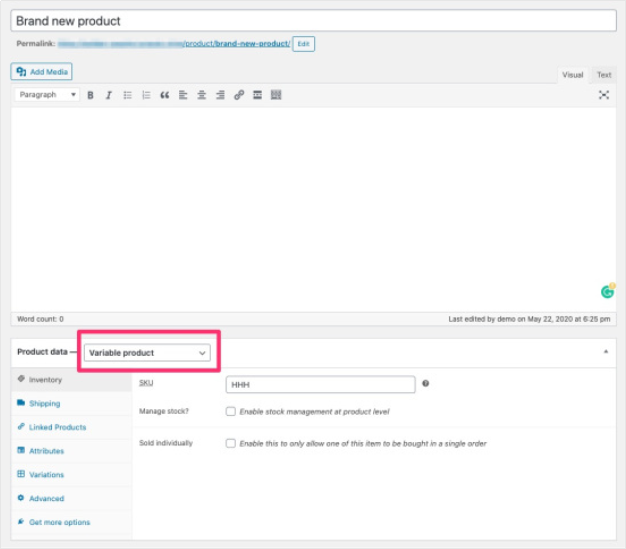
3.┬Ā┬Ā┬Ā┬Ā Select Variable product from the Product Data dropdown.
┬Ā
┬Ā
Step 2. Add Attributes to Use for Variations
In the Attributes section, add attributes before creating variations ŌĆö use global attributes that are site-wide or define custom ones specific to a product.
Global Attributes
To use a global attribute:
1.┬Ā┬Ā┬Ā┬Ā Create global attributes.
2.┬Ā┬Ā┬Ā┬Ā Select one from the dropdown and click Add.
3.┬Ā┬Ā┬Ā┬Ā Choose Select all to add all attributes to the variable product (if applicable).
4.┬Ā┬Ā┬Ā┬Ā Enable the Used for variations checkbox to tell WooCommerce itŌĆÖs for your variations.
5.┬Ā┬Ā┬Ā┬Ā Click Save attributes.
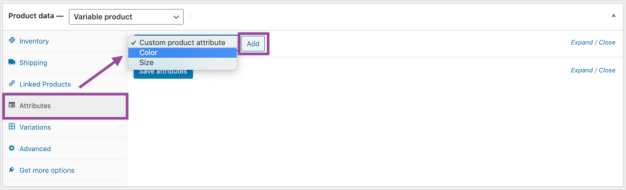 Adding a global attribute
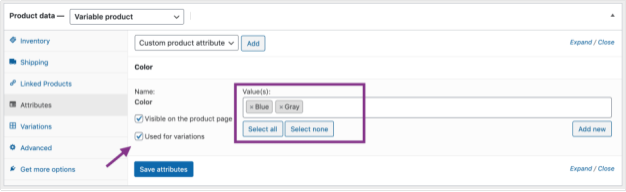 Adding global attribute values
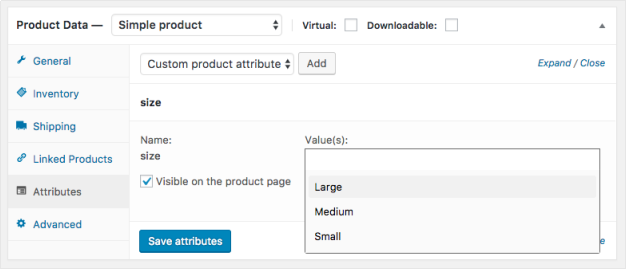
Custom Attributes
To add a new attribute specific to this product:
1.┬Ā┬Ā┬Ā┬Ā Select Custom product attribute and click Add.
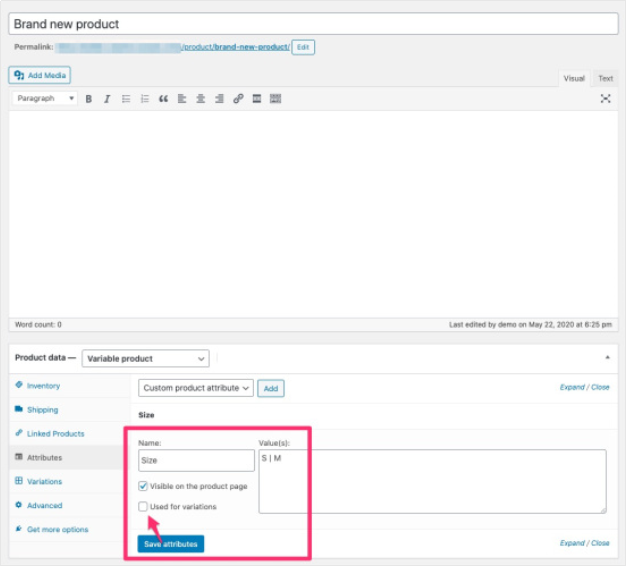
2.┬Ā┬Ā┬Ā┬Ā Name the attribute (e.g., Size).
3.┬Ā┬Ā┬Ā┬Ā Set values separated by a vertical pipe, | (e.g., Small | Medium | Large).
4.┬Ā┬Ā┬Ā┬Ā Enable the Used for variations checkbox.
5.┬Ā┬Ā┬Ā┬Ā Click Save attributes.
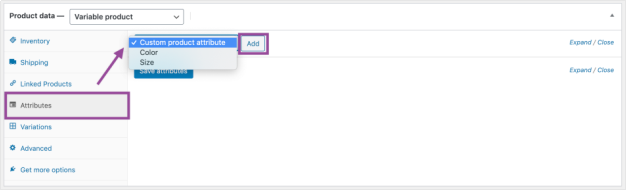 Adding a custom attribute
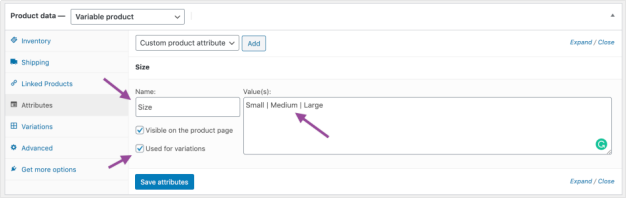 Adding custom attribute values
┬Ā
┬Ā
┬Ā
┬Ā
┬Ā
┬Ā
┬Ā
┬Ā
┬Ā
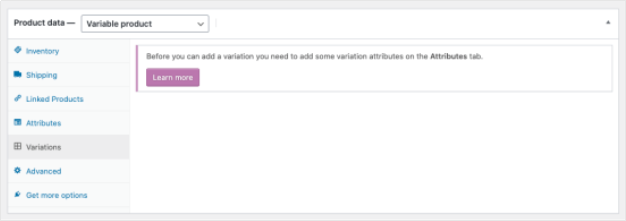
Step 3. Add Variations
To add a variation, go to the Variations section in the Product Data meta box.
Manually Add a Variation
1.┬Ā┬Ā┬Ā┬Ā Select Add variation from the dropdown menu, and select Go.

┬Ā
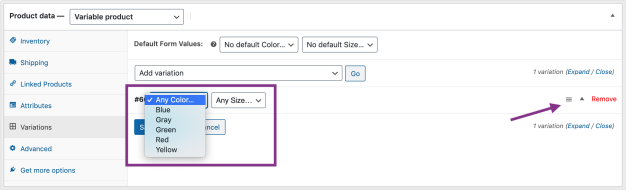
2.┬Ā┬Ā┬Ā┬Ā Select attributes for your variation. To change additional data, click the triangle icon to expand the variation.
 ┬Ā
┬Ā
3.┬Ā┬Ā┬Ā┬Ā Edit any available data. The only required field is Regular Price.
4.┬Ā┬Ā┬Ā┬Ā Click Save changes.
Creating All Possible Variations
Select Create variations from all attributes to have WooCommerce create every possible combination of variations and click Go:
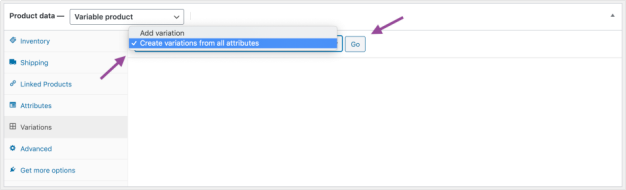
It will create a new variation for each and every possible combination of variation attributes (max 50 per run). If you have more possible combinations you can run it again.
If you have two attributes ŌĆō color (with values blue and green) and size (with values large and small) it creates the following variations:
ŌŚÅ┬Ā┬Ā┬Ā┬Ā┬Ā┬Ā Large Blue
ŌŚÅ┬Ā┬Ā┬Ā┬Ā┬Ā┬Ā Large Green
ŌŚÅ┬Ā┬Ā┬Ā┬Ā┬Ā┬Ā Small Blue
ŌŚÅ┬Ā┬Ā┬Ā┬Ā┬Ā┬Ā Small Green
Editing Many Variations
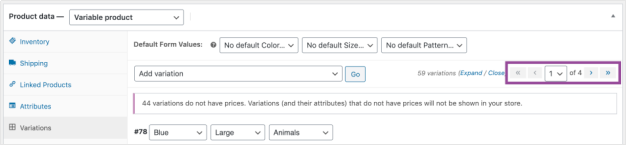
If you have more than 15 variations, use the buttons to navigate forward and backward through the list. Each time you navigate to a new set of variations, the previous set is saved. This ensures that all data is saved.
┬Ā
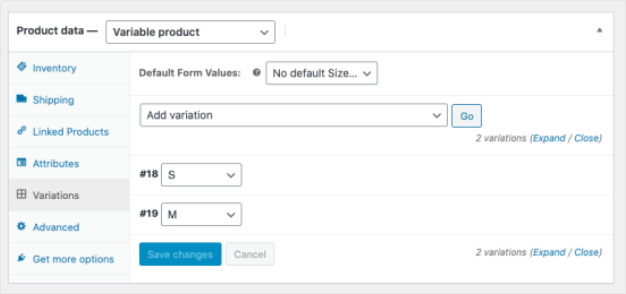
Setting Defaults
Set defaults you prefer on variations. In the example, no default form values were set, so users can pick any color and size right away from the product page.

If you want a certain variation already selected when a user visits the product page, choose the default form values. This also enables the Add to Cart button to appear automatically on variable product pages.
You can only set defaults after at least one variation has been created.
Adding Variation Data
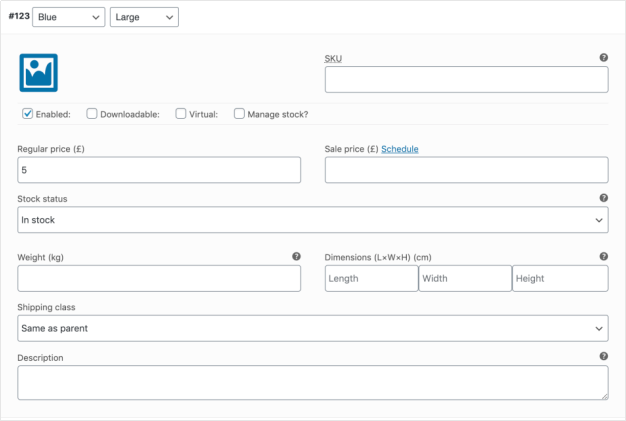
Each variation can have the following properties.
General
ŌŚÅ┬Ā┬Ā┬Ā┬Ā┬Ā┬Ā Enabled ŌĆō Enable or disable the variation.
ŌŚÅ┬Ā┬Ā┬Ā┬Ā┬Ā┬Ā Downloadable ŌĆō If this a downloadable variation.
ŌŚÅ┬Ā┬Ā┬Ā┬Ā┬Ā┬Ā Virtual ŌĆō If this product isnŌĆÖt physical or shipped, shipping settings are removed.
ŌŚÅ┬Ā┬Ā┬Ā┬Ā┬Ā┬Ā Regular Price (required) ŌĆō Set the price for this variation.
ŌŚÅ┬Ā┬Ā┬Ā┬Ā┬Ā┬Ā Sale Price (optional) ŌĆō Set a price for this variation when on sale.
ŌŚÅ┬Ā┬Ā┬Ā┬Ā┬Ā┬Ā Tax status ŌĆō Taxable, shipping only, none.
ŌŚÅ┬Ā┬Ā┬Ā┬Ā┬Ā┬Ā Tax class ŌĆō Tax class for this variation. Useful if you are offering variations spanning different tax bands.
ŌŚÅ┬Ā┬Ā┬Ā┬Ā┬Ā┬Ā Downloadable Files ŌĆō Shows if Downloadable is selected. Add file(s) for customers to download.
ŌŚÅ┬Ā┬Ā┬Ā┬Ā┬Ā┬Ā Download Limit ŌĆō Shows if Downloadable is selected. Set how many times a customer can download the file(s). Leave blank for unlimited.
ŌŚÅ┬Ā┬Ā┬Ā┬Ā┬Ā┬Ā Download Expiry ŌĆō Shows if Downloadable is selected. Set the number of days before a download expires after purchase.
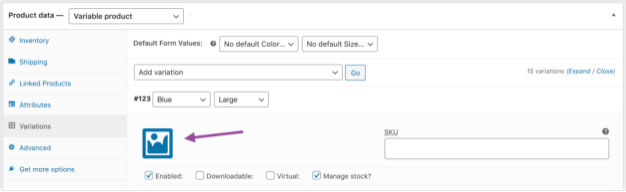
Inventory Management
Inventory for variable products can be managed on product and variation level.
ąĪhoose how to manage stock by toggling Enable stock management at product level on the Inventory tab:
The following settings are available if you choose to manage stock on a product level:
ŌŚÅ┬Ā┬Ā┬Ā┬Ā┬Ā┬Ā SKU ŌĆō If you use SKUs, set the SKU or leave blank to use the productŌĆÖs SKU.
ŌŚÅ┬Ā┬Ā┬Ā┬Ā┬Ā┬Ā Manage Stock? ŌĆō Tick the box to manage stock at the variation level.
ŌŚÅ┬Ā┬Ā┬Ā┬Ā┬Ā┬Ā Stock Quantity ŌĆō Shows if Manage Stock is selected. Input the quantity. Stock for the specific variation, or left blank to use the productŌĆÖs stock settings.
ŌŚÅ┬Ā┬Ā┬Ā┬Ā┬Ā┬Ā Allow Backorders ŌĆō Choose how to handle backorders.
ŌŚÅ┬Ā┬Ā┬Ā┬Ā┬Ā┬Ā Low stock threshold ŌĆō Enter a number to be notified.
ŌŚÅ┬Ā┬Ā┬Ā┬Ā┬Ā┬Ā Sold Individually? ŌĆō Allow only one to be sold in one order. (This setting is used for the product itself. You cannot set a specific variation to only be sold once per order.)
Choosing to manage stock for variations individually allows you to edit the same properties for each variation.
Set Stock Status can be applied to all variations at once to In stock or Out of stock. Bulk-update under Variations:

Shipping
ŌŚÅ┬Ā┬Ā┬Ā┬Ā┬Ā┬Ā Weight ŌĆō Weight for the variation, or left blank to use the productŌĆÖs weight.
ŌŚÅ┬Ā┬Ā┬Ā┬Ā┬Ā┬Ā Dimensions ŌĆō Height, width and length for the variation, or left blank to use the productŌĆÖs dimensions.
ŌŚÅ┬Ā┬Ā┬Ā┬Ā┬Ā┬Ā Shipping class ŌĆō Shipping class can affect shipping. Set this if it differs from the product.
┬Ā
┬Ā
If the SKU, weight, dimensions, and stock fields are not set, then it inherits values assigned to the variable product. Price fields must be set per variation.
Add an Image to the Variation
1.┬Ā┬Ā┬Ā┬Ā Expand the variation.
2.┬Ā┬Ā┬Ā┬Ā Click the blue image placeholder (screenshot).
3.┬Ā┬Ā┬Ā┬Ā Select the image you wish to use.
4.┬Ā┬Ā┬Ā┬Ā Save.
Bulk Editing
You can bulk-edit variations by selecting the specific piece of data you want from the dropdown. In this example, I want to edit prices for all variations:

┬Ā
┬Ā
┬Ā
┬Ā
┬Ā
┬Ā
Managing Product Categories, Tags and Attributes
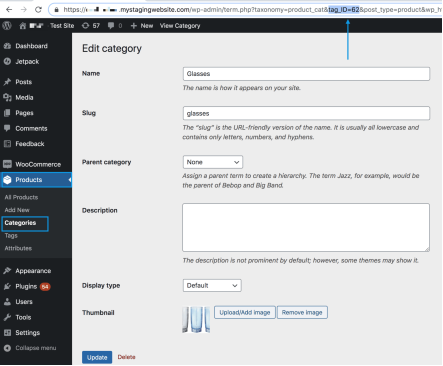
How to add/edit product categories
Categories are managed from the Products > Categories screen.
Similar to categories on your posts in WordPress, you can add, delete, and edit product categories.
ŌŚÅ┬Ā┬Ā┬Ā┬Ā┬Ā┬Ā Add a Name.
ŌŚÅ┬Ā┬Ā┬Ā┬Ā┬Ā┬Ā Add a Slug (optional); this is the URL-friendly version of the name.
ŌŚÅ┬Ā┬Ā┬Ā┬Ā┬Ā┬Ā Choose a Parent if this is a subcategory.
ŌŚÅ┬Ā┬Ā┬Ā┬Ā┬Ā┬Ā Enter a Description (optional); some themes display this.
ŌŚÅ┬Ā┬Ā┬Ā┬Ā┬Ā┬Ā Choose the Display type. Decide what is shown on the categoryŌĆÖs landing page. ŌĆ£StandardŌĆØ uses your themeŌĆÖs default. ŌĆ£SubcategoriesŌĆØ will display only the subcategories. ŌĆ£ProductsŌĆØ only displays products. ŌĆ£BothŌĆØ will display subcategories and products below that.
ŌŚÅ┬Ā┬Ā┬Ā┬Ā┬Ā┬Ā Upload/Add Image (optional);┬Ā Some themes have pages where product category images are displayed, so this is a good idea.
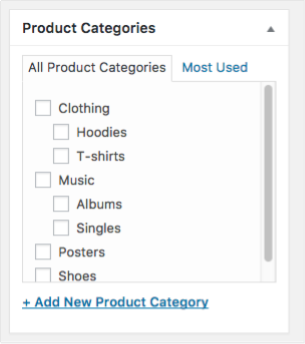
When you add a new product via Products > Add Product, you can select this new product category from the list.
Alternatively, you can go to Products > Add Product directly, and select Add New Product Category.
How to add/edit product attributes
Set global attributes
Go to Products > Attributes to add, edit, and remove attributes.
Here you can quickly and easily add attributes and their terms.
ŌŚÅ┬Ā┬Ā┬Ā┬Ā┬Ā┬Ā Add a Name.
ŌŚÅ┬Ā┬Ā┬Ā┬Ā┬Ā┬Ā Add a Slug; (optional); this is the URL-friendly version of the name.
ŌŚÅ┬Ā┬Ā┬Ā┬Ā┬Ā┬Ā Enable Archives if desired. If enabled, you can view a page with all products having this attribute. For example, if you have this enabled, and ŌĆ£blackŌĆØ is one of the options under ŌĆ£colorŌĆØ, you can add http://yourstore.com/pa_color/black/ to your menu to only display black clothing ŌĆō pa stands for ŌĆ£product attribute.ŌĆØ
ŌŚÅ┬Ā┬Ā┬Ā┬Ā┬Ā┬Ā Select a Default sort order. Choose between ŌĆ£NameŌĆØ, ŌĆ£Name (numeric)ŌĆØ, ŌĆ£Term IDŌĆØ or ŌĆ£Custom orderingŌĆØ where you decide by dragging and dropping the terms in the list when configuring the terms (see below). ŌĆ£Name (numeric)ŌĆØ is relevant if the values are numbers. If you select ŌĆ£NameŌĆØ, it sorts alphabetically with 1 and 10 preceding 2. If you select ŌĆ£Name (numeric)ŌĆØ it sorts based on numerical value. ![]()
![]()
Select Add Attribute.
The attribute is added in the table on the right, but without values.
Select the ŌĆ£Configure termsŌĆØ text to add attribute values.

Next Add New ŌĆ£Attribute nameŌĆØ, where ŌĆ£Attribute nameŌĆØ automatically takes the name you gave the attribute in the previous step.
Add as many values as you wish. If you selected ŌĆ£Custom orderingŌĆØ for the attribute, reordering your values can be done here.
Add global attributes to product
Add the created attributes to your products.
1.┬Ā┬Ā┬Ā┬Ā Go to: Products > Add Product (or edit an existing one).
2.┬Ā┬Ā┬Ā┬Ā Select the Attributes tab in the Product Data. There you can choose any of the attributes that youŌĆÖve created in the dropdown menu.
3.┬Ā┬Ā┬Ā┬Ā Select Add.
If you selected a global attribute that you previously created, you can select terms that you added previously.
Add custom attributes
Alternatively, add an attribute you only want to use for one product. This would only be ideal if you have a product with unique variations.
1.┬Ā┬Ā┬Ā┬Ā Go to: Product > Add Product.
2.┬Ā┬Ā┬Ā┬Ā Select the Attributes tab.
3.┬Ā┬Ā┬Ā┬Ā Select Custom product attribute in the dropdown and follow the above steps.
┬Ā
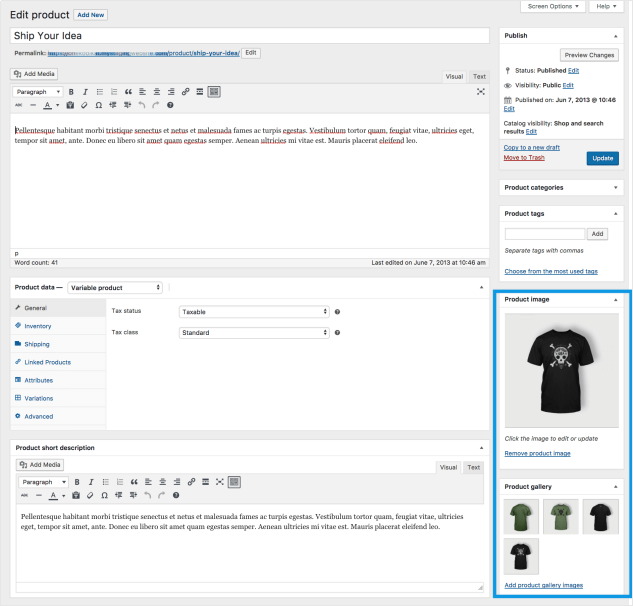
Adding product images and galleries are options available on the right-hand side when adding or editing a product in your store from WooCommerce > Products.
┬Ā
Product image
The Product Image is the main image for your product and is reused in different sizes across your store.
Select Set Product Image.
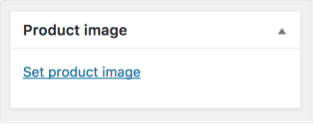
Select an existing image in your Media Library or Upload a new one.
┬Ā
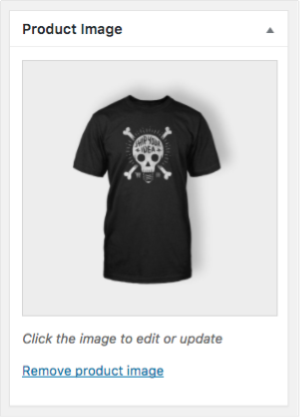
Remove and Edit the product image if youŌĆÖd like to change it, as needed.
Adding, removing and editing a product image is done in the same way as featured images for posts and pages.
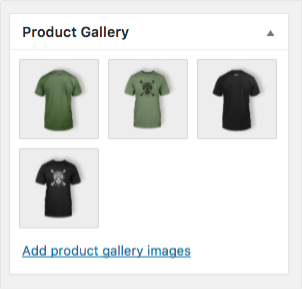
Product Galleries
Add images to the Product Gallery
Product galleries display all images attached to a product through the Product Gallery meta box.
Create a Product Gallery using the same method as adding a Product Image, but using the Product Gallery meta box.
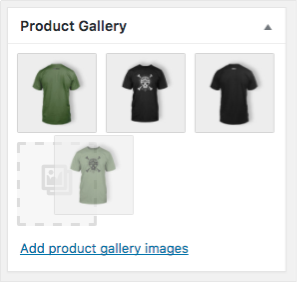
Reorder images in the product gallery
Images in the product gallery can be re-ordered easily via drag and drop. Simply reorder your images by moving them around.
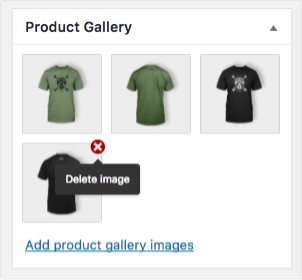
Remove images from the product gallery
To remove an image from the product gallery, hover over the image and click on the red ŌĆ£x.ŌĆØ
┬Ā
Set up Related Products, Up-Sells and Cross-Sells
Products can be Related to each other in three ways: Up-Sells, Cross-Sells or by having the same tags or categories.
To add an up-sell or cross-sell to a product:
1.┬Ā┬Ā┬Ā┬Ā Go to WooCommerce > Products and select the product on which youŌĆÖd like to show an up-sell or cross-sell.
2.┬Ā┬Ā┬Ā┬Ā Scroll down to the Product Data panel.
3.┬Ā┬Ā┬Ā┬Ā Select the Linked Products tab in the left menu.
4.┬Ā┬Ā┬Ā┬Ā Add the product you wish to link to by searching for it.
5.┬Ā┬Ā┬Ā┬Ā Update.
Note: related products, up-sells and cross-sells are all sorted randomly.
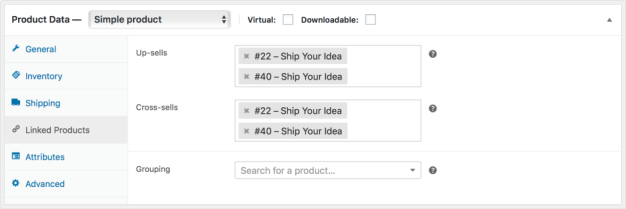
Up-Sells
Up-sells are products that you recommend instead of the currently viewed product.
They are typically products that are more profitable or better quality or more expensive. Depending on your theme template, these products display on the single product page underneath the productŌĆÖs description.
ŌŚÅ┬Ā┬Ā┬Ā┬Ā┬Ā┬Ā Up-sells (user defined) show on the product page.

┬Ā
Product Up-Sells
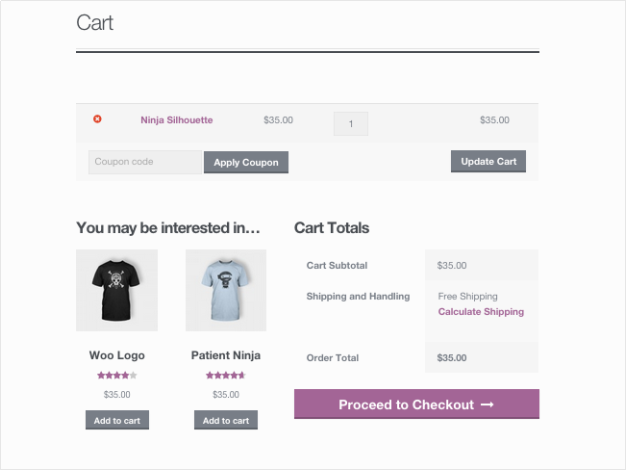
Cross-sells are products that you promote in the cart, based on the current product.
They are typically complementary items. For example, if you are selling a laptop, cross-sells might be a protective case or stickers or a special adapter. Or if youŌĆÖre selling a ninja t-shirt, they could be a ninja hoodie and ninja socks.
Depending on your theme template, they display on the cart page underneath the cart products table with a thumbnail image.
ŌŚÅ┬Ā┬Ā┬Ā┬Ā┬Ā┬Ā Cross-sells (user defined) show on the cart page.
┬Ā
┬Ā
┬Ā
┬Ā
┬Ā
┬Ā
┬Ā
Cross Sells
Related Products
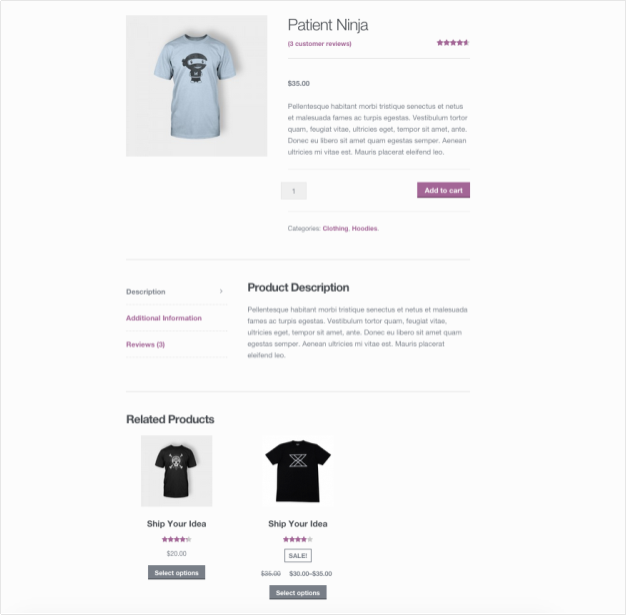
Related Products is a section on some templates that pulls products from your store that share the same tags or categories as the current product.
These products cannot be specified in the admin, but can be influenced by grouping similar products in the same category or by using the same tags.
ŌŚÅ┬Ā┬Ā┬Ā┬Ā┬Ā┬Ā Related products (automatic) also show on the product page.
┬Ā
┬Ā
┬Ā
┬Ā
┬Ā
┬Ā
┬Ā
┬Ā
┬Ā
┬Ā
┬Ā
┬Ā
Import
Adding New Products
First-time and existing store owners using WooCommerce can use the CSV to add new products with one upload.
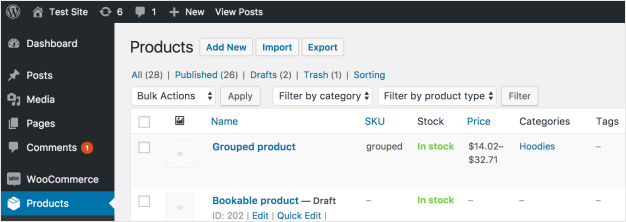
1. Go to: WooCommerce > Products.
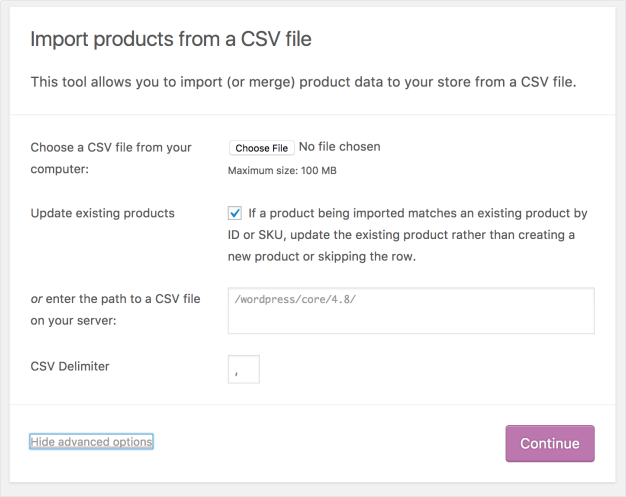
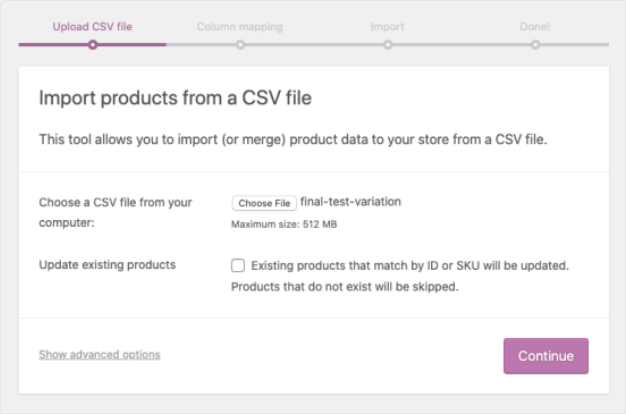
2. Select Import at the top. The Upload CSV File screen displays.
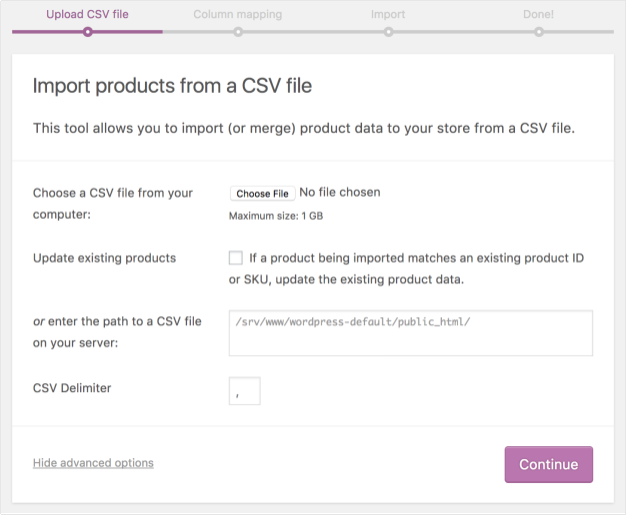
3. Select Choose File and the CSV you wish you use.
CSV delimiter (Advanced option): Generally CSV elements are separated by a comma. If you are using a different delimiter in your file, you can set it here.
4. Continue.
The Column Mapping screen displays, and WooCommerce automatically attempts to match or ŌĆ£mapŌĆØ the Column Name from your CSV to Fields.
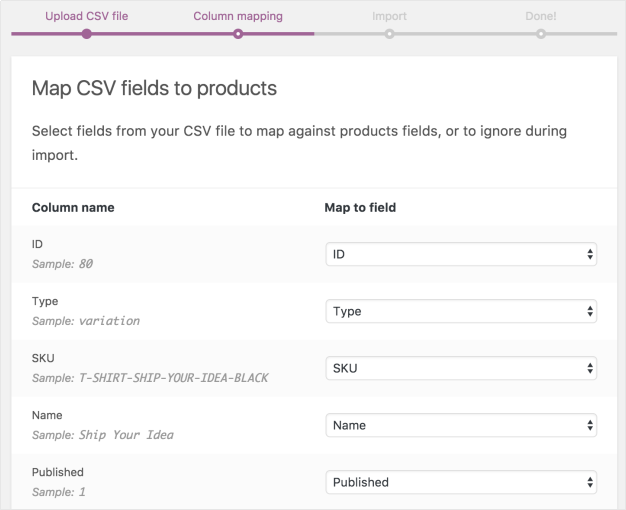
5. Use dropdown menus on the right side to adjust fields or indicate ŌĆśDo not import.ŌĆÖ
*Any unrecognized columns will not be imported by default.
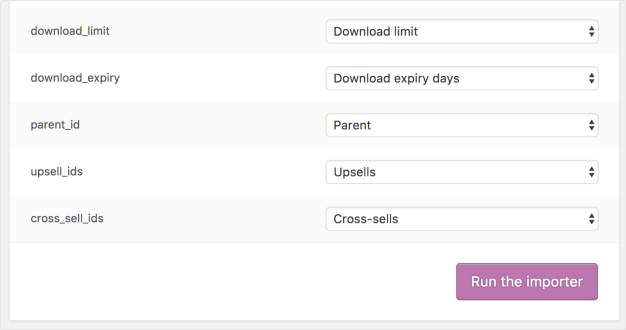
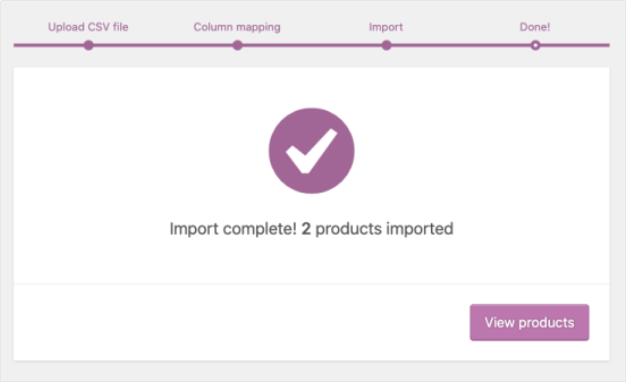
6. Select Run the Importer.
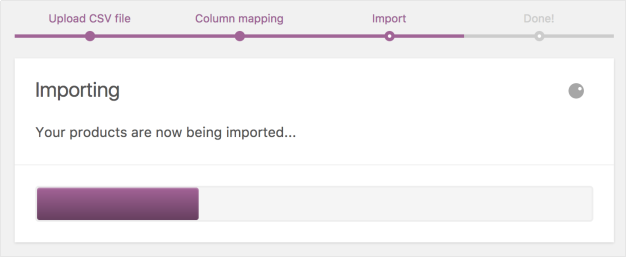
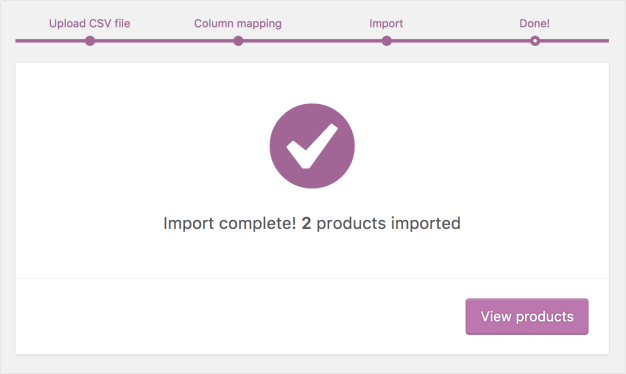
7. Wait until the Importer is finished. Do not refresh or touch the browser while in progress.
Update Existing Products
Store owners can use the CSV Importer tool to update existing products with new info, e.g., Adding a brand, changing a tax class, bulk-update for a special sale or event, etc.
- Make a CSV file as indicated in Create Your CSV, using the IDs and/or SKUs of products you wish to update.
The importer uses the ID and/or SKU to auto-match and auto-update whatever info you enter on each line.
- Go to: WooCommerce > Products.
- Select Import at the top. The Upload CSV File screen displays.
- Select Choose File and the CSV you wish you use.
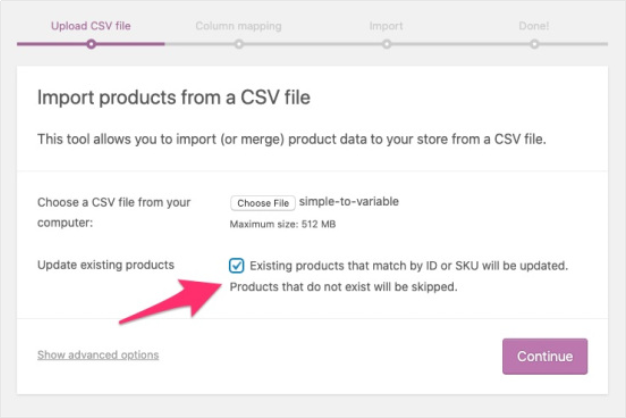
- Tick the checkbox for Update Existing Products.
6. Continue.
The Column Mapping screen displays, and WooCommerce automatically attempts to match or ŌĆ£mapŌĆØ the Column Name from your CSV to Fields.
7. Use dropdown menus on the right side to adjust fields or indicate ŌĆśDo not import.ŌĆÖ
*Any unrecognized columns will not be imported by default.
8. Select Run the Importer.
9. Wait until the Importer is finished. Do not refresh or touch the browser while in progress.
┬Ā
Converting existing simple product to variable product
Store owners can use the CSV Importer tool to convert the existing simple product to a variable. In order to do that, the following steps need to be taken:
1.Create a simple product that has a price and SKU.
2. Export product via built-in CSV Exporter on the All Products page.
3. Open CSV file and convert the simple product to a variable. Steps that need to be taken for it (for example to convert to a variable product with 1 attribute and 2 variations):
ŌŚÅ┬Ā┬Ā┬Ā┬Ā┬Ā┬Ā Add 2 new rows
ŌŚÅ┬Ā┬Ā┬Ā┬Ā┬Ā┬Ā Add 4 new columns after the last column:
ŌŚÅ┬Ā┬Ā┬Ā┬Ā┬Ā┬Ā Attribute 1 name
ŌŚÅ┬Ā┬Ā┬Ā┬Ā┬Ā┬Ā Attribute 1 value(s)
ŌŚÅ┬Ā┬Ā┬Ā┬Ā┬Ā┬Ā Attribute 1 visible
ŌŚÅ┬Ā┬Ā┬Ā┬Ā┬Ā┬Ā Attribute 1 global
In our case, we are adding Size variations so our new 4 columns look as follows:
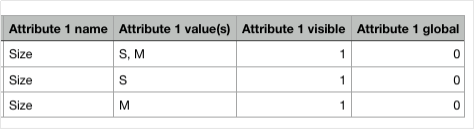
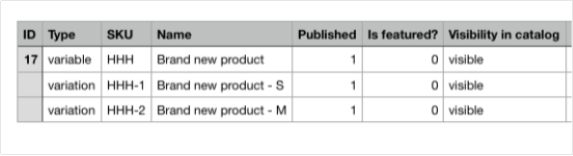
ŌŚÅ┬Ā┬Ā┬Ā┬Ā┬Ā┬Ā Change the type of the product from simple to variable and add type variation to variation rows (2 new rows that you created). Add SKU to variation rows. Give it a name as well. It looks like this in our example:
ŌŚÅ┬Ā┬Ā┬Ā┬Ā┬Ā┬Ā Update the following columns as well (and any other columns if needed):

ŌŚÅ┬Ā┬Ā┬Ā┬Ā┬Ā┬Ā Very important ŌĆō add SKU to all fields in the Parent column ŌĆō this is to map parent product with its variations:

4. Save a new CSV file.
5. Import the updated CSV file back to the site using built-in CSV Importer on All Products view.
6. Select to update existing products before import since we want to update the
existing product on the site:
┬Ā
7. Proceed with import (nothing to be mapped).
8. You will see the following which is expected:
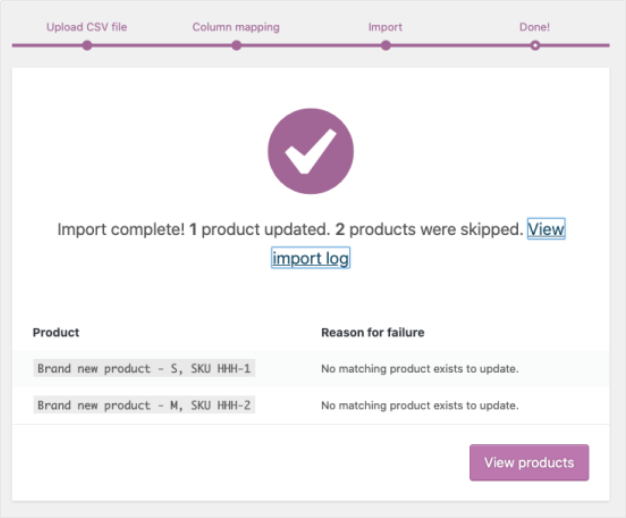
┬Ā
9. Navigate to the product. You will see that it is now variable and has 1 attribute added but no variations were created. Note that Used for variations checkbox is not selected. This is also expected:
10. Next, open the CSV file again (the one where you already created rows for variations) and delete the parent product row. Leave variations rows without changes:


11. Save the updated CSV file.
12. Next, import updated CSV file to the site but this time donŌĆÖt select the box next to Update existing products:
13. Proceed with import (no fields need to be mapped). You should see that variations have been imported:
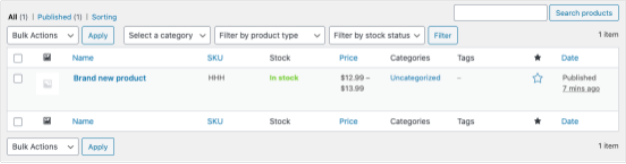
14. After completing the import, navigate to the product. It should now be a variable product with variations:
┬Ā
Export
Store owners wishing to export their current catalog of products for any reason can generate a CSV using the Product Importer/Exporter.
1. Go to: WooCommerce > Products.
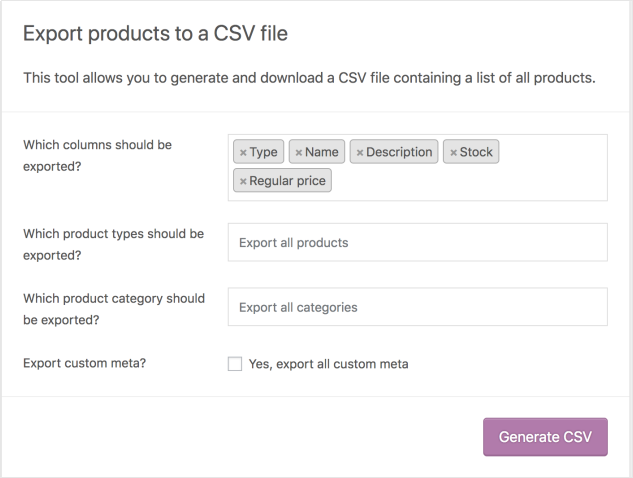
2. Select Export at the top. The Export Products screen displays.
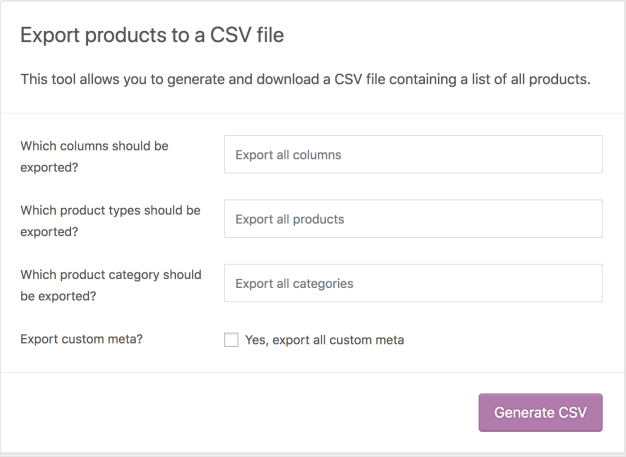
3. Select to Export All Columns. Or select which columns to export by using the dropdown menu.

4/ Select to Export All Products. Or select which product types to export by using the dropdown menu.

5/Select to Export All Categories. Or select which categories to export by using the dropdown menu.
6/ Tick the box to Export Custom Meta, if you need this info.
Meta data on your products is typically from other plugins. Meta data columns are exported following the meta:-prefix standard detailed above in the importer mapping section. By default, no additional meta data is exported.
7/ Select Generate CSV. Wait for the export to finish.
8/ Exit the exporter.
┬Ā
┬Ā
┬Ā
┬Ā
┬Ā
┬Ā
┬Ā
┬Ā
┬Ā
┬Ā
┬Ā
┬Ā
┬Ā
┬Ā
┬Ā
┬Ā
┬Ā
┬Ā
┬Ā
┬Ā
┬Ā
┬Ā
Export
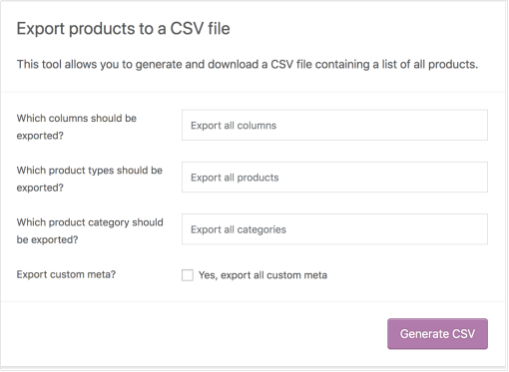
Store owners wishing to export their current catalog of products for any reason can generate a CSV using the Product Importer/Exporter.
1. Go to: WooCommerce > Products.
2. Select Export at the top. The Export Products screen displays.
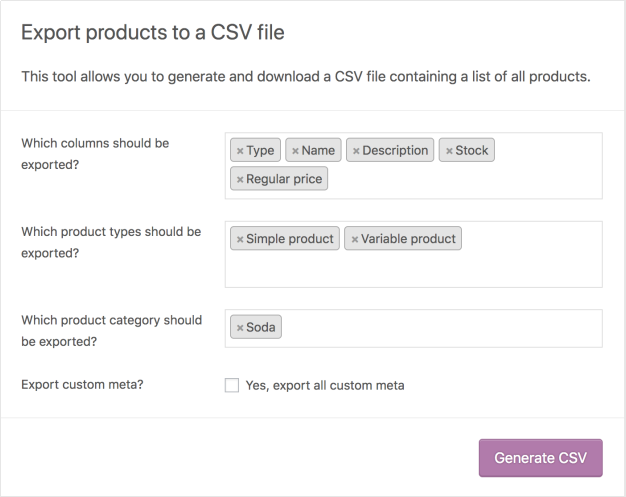
3/ Select to Export All Columns. Or select which columns to export by using the dropdown menu.
┬Ā
4. Select to Export All Products. Or select which product types to export by using the dropdown menu.
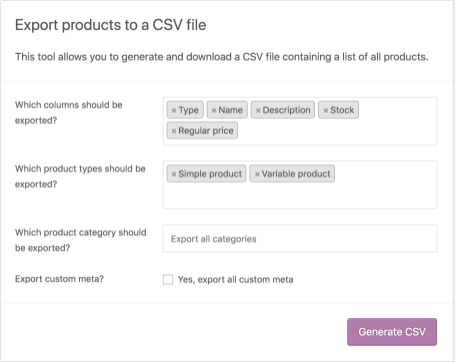
5. Select to Export All Categories. Or select which categories to export by using the dropdown menu.
6. Tick the box to Export Custom Meta, if you need this info.
Meta data on your products is typically from other plugins. Meta data columns are exported following the meta:-prefix standard detailed above in the importer mapping section. By default, no additional meta data is exported.
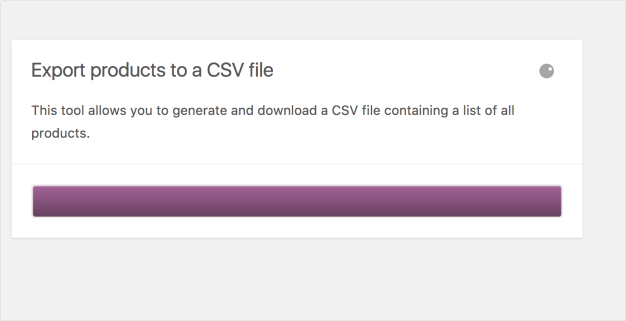
7. Select Generate CSV. Wait for the export to finish.
8. Exit the exporter.
┬Ā
Managing Orders
┬Ā
Order Statuses
An order also has a Status. Order statuses let you know how far along the order is, starting with ŌĆ£Pending paymentŌĆØ and ending with ŌĆ£Completed.ŌĆØ The following order statuses are used:
ŌŚÅ┬Ā┬Ā┬Ā┬Ā┬Ā┬Ā Pending payment ŌĆö Order received, no payment initiated. Awaiting payment (unpaid).
ŌŚÅ┬Ā┬Ā┬Ā┬Ā┬Ā┬Ā Failed ŌĆö Payment failed or was declined (unpaid) or requires authentication (SCA). Note that this status may not show immediately and instead show as Pending until verified (e.g., PayPal).
ŌŚÅ┬Ā┬Ā┬Ā┬Ā┬Ā┬Ā Processing ŌĆö Payment received (paid) and stock has been reduced; order is awaiting fulfillment. All product orders require processing, except those that only contain products which are both Virtual and Downloadable.
ŌŚÅ┬Ā┬Ā┬Ā┬Ā┬Ā┬Ā Completed ŌĆö Order fulfilled and complete ŌĆō requires no further action.
ŌŚÅ┬Ā┬Ā┬Ā┬Ā┬Ā┬Ā On hold ŌĆö Awaiting payment ŌĆō stock is reduced, but you need to confirm payment.
ŌŚÅ┬Ā┬Ā┬Ā┬Ā┬Ā┬Ā Canceled ŌĆö Canceled by an admin or the customer ŌĆō stock is increased, no further action required.
ŌŚÅ┬Ā┬Ā┬Ā┬Ā┬Ā┬Ā Refunded ŌĆö Refunded by an admin ŌĆō no further action required.
ŌŚÅ┬Ā┬Ā┬Ā┬Ā┬Ā┬Ā Authentication required ŌĆö Awaiting action by the customer to authenticate the transaction and/or complete SCA requirements.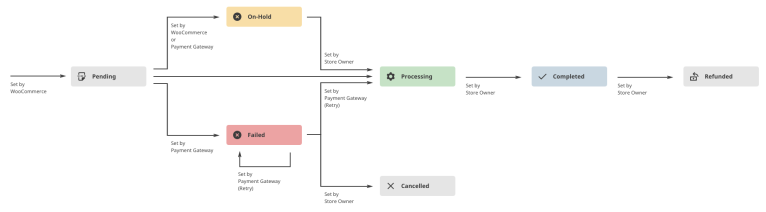
┬Ā
┬Ā
Viewing and Managing Multiple Orders
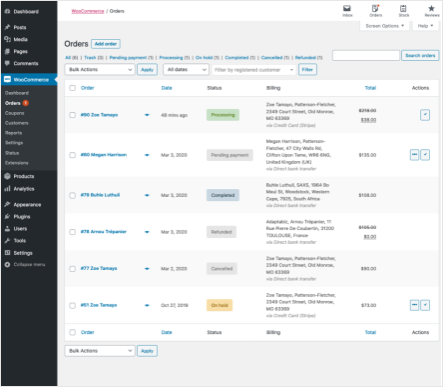
Orders Overview
When a shop starts taking orders, the Orders management page begins to fill up. Go to: WooCommerce > Orders.
Each row displays several details. Some are there by default, others can be added. These are the available options:
ŌŚÅ┬Ā┬Ā┬Ā┬Ā┬Ā┬Ā Order number and customer name,
ŌŚÅ┬Ā┬Ā┬Ā┬Ā┬Ā┬Ā Date of purchase,
ŌŚÅ┬Ā┬Ā┬Ā┬Ā┬Ā┬Ā Order status,
ŌŚÅ┬Ā┬Ā┬Ā┬Ā┬Ā┬Ā Billing address,
ŌŚÅ┬Ā┬Ā┬Ā┬Ā┬Ā┬Ā Shipping address,
ŌŚÅ┬Ā┬Ā┬Ā┬Ā┬Ā┬Ā Purchase total, and
ŌŚÅ┬Ā┬Ā┬Ā┬Ā┬Ā┬Ā Actions.
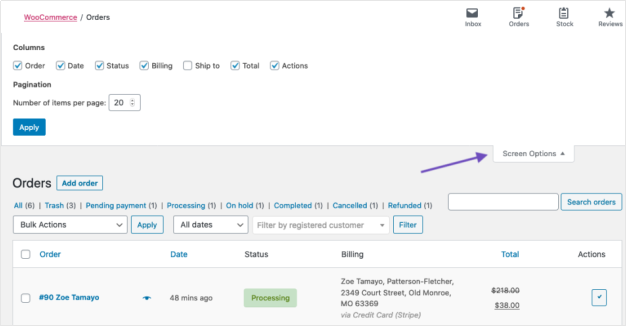
To change these columns:
ŌŚÅ┬Ā┬Ā┬Ā┬Ā┬Ā┬Ā Go to: WooCommerce > Orders.
ŌŚÅ┬Ā┬Ā┬Ā┬Ā┬Ā┬Ā Select Screen Options in the top right corner.
ŌŚÅ┬Ā┬Ā┬Ā┬Ā┬Ā┬Ā Select which Columns to show.
ŌŚÅ┬Ā┬Ā┬Ā┬Ā┬Ā┬Ā Select how many Items you want to be displayed on each page.
ŌŚÅ┬Ā┬Ā┬Ā┬Ā┬Ā┬Ā Then Apply.
Filter and Arrange Orders
Filter orders by Date (month/year) or by registered customer.
ŌŚÅ┬Ā┬Ā┬Ā┬Ā┬Ā┬Ā Select the month, or search for a customer.
ŌŚÅ┬Ā┬Ā┬Ā┬Ā┬Ā┬Ā Select Filter.

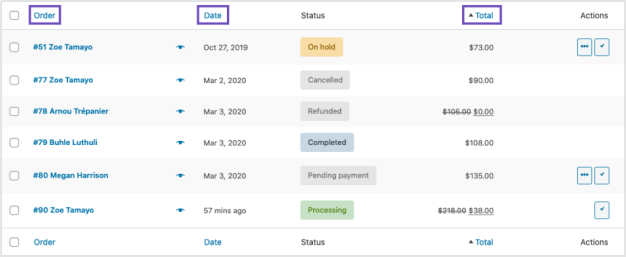
Arrange orders in ascending or descending order by Order number, Date or Total by select the heading.
Note that the ŌĆ£TotalŌĆØ column does not take the refunded amount into consideration.
Click the order number and customer name to see the Single Order page, where you can also Edit order details, Update Status, and Add Notes. More details on that in Viewing and Editing Single Orders.
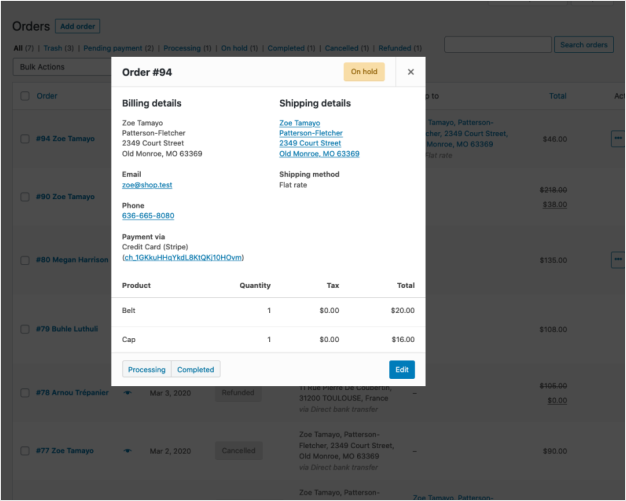
Previewing Orders
Order rows have a Preview ŌĆ£eye.ŌĆØ
![]()
Clicking Preview opens a Modal, containing the order number, order status, billing details, payment method, shipping details, shipping method, items ordered, and the option to change the order status.
Order Statuses in the Overview
Order Statuses are color-coded and descriptive.
ŌŚÅ┬Ā┬Ā┬Ā┬Ā┬Ā┬Ā Canceled ŌĆō Grey
ŌŚÅ┬Ā┬Ā┬Ā┬Ā┬Ā┬Ā Completed ŌĆō Blue
ŌŚÅ┬Ā┬Ā┬Ā┬Ā┬Ā┬Ā Failed ŌĆō Red
ŌŚÅ┬Ā┬Ā┬Ā┬Ā┬Ā┬Ā On Hold ŌĆō Orange
ŌŚÅ┬Ā┬Ā┬Ā┬Ā┬Ā┬Ā Pending Payment ŌĆō Grey
ŌŚÅ┬Ā┬Ā┬Ā┬Ā┬Ā┬Ā Processing ŌĆō Green
ŌŚÅ┬Ā┬Ā┬Ā┬Ā┬Ā┬Ā Refunded ŌĆō Grey
Order Actions
Hovering over an order Status displays Notes made on the order.

At the end of a row are shortcut buttons to quickly mark orders as Processing or Complete.
![]()
Viewing and Editing a Single Order
From the Single Order page not only can you view all order data, but also edit and update.
ŌŚÅ┬Ā┬Ā┬Ā┬Ā┬Ā┬Ā Change the order status.
ŌŚÅ┬Ā┬Ā┬Ā┬Ā┬Ā┬Ā Edit order items ŌĆō modify the product, prices, and taxes.
ŌŚÅ┬Ā┬Ā┬Ā┬Ā┬Ā┬Ā Stock ŌĆō Reduce and restore stock for an order
ŌŚÅ┬Ā┬Ā┬Ā┬Ā┬Ā┬Ā Order Actions ŌĆō Email order details to customer (handy if manually creating an order for your customers) or Regenerate download permissions
ŌŚÅ┬Ā┬Ā┬Ā┬Ā┬Ā┬Ā Modify product Meta to edit product variations by removing and adding meta
ŌŚÅ┬Ā┬Ā┬Ā┬Ā┬Ā┬Ā Apply coupons. You will need to know the coupon code to apply to the order. Coupon usage counts are tracked, and coupons can also be removed from orders. Note: the order must be unpaid for coupons to have an affect
ŌŚÅ┬Ā┬Ā┬Ā┬Ā┬Ā┬Ā Add fee. You can enter an amount or percentage to add a fee to an order. Negative fees will apportion taxes between all other items, and will not make the cart total go below zero
Order Details
Viewing Order Details
The Order Details panel you can view:
ŌŚÅ┬Ā┬Ā┬Ā┬Ā┬Ā┬Ā Order number
ŌŚÅ┬Ā┬Ā┬Ā┬Ā┬Ā┬Ā Payment details
ŌŚÅ┬Ā┬Ā┬Ā┬Ā┬Ā┬Ā Order date and time
ŌŚÅ┬Ā┬Ā┬Ā┬Ā┬Ā┬Ā Order status
ŌŚÅ┬Ā┬Ā┬Ā┬Ā┬Ā┬Ā Customer details:
ŌŚŗ┬Ā┬Ā┬Ā┬Ā┬Ā┬Ā Username and email, together with a link to view their profile and other purchases the customer may have had in the past
ŌŚŗ┬Ā┬Ā┬Ā┬Ā┬Ā┬Ā Billing details
ŌŚŗ┬Ā┬Ā┬Ā┬Ā┬Ā┬Ā Shipping details
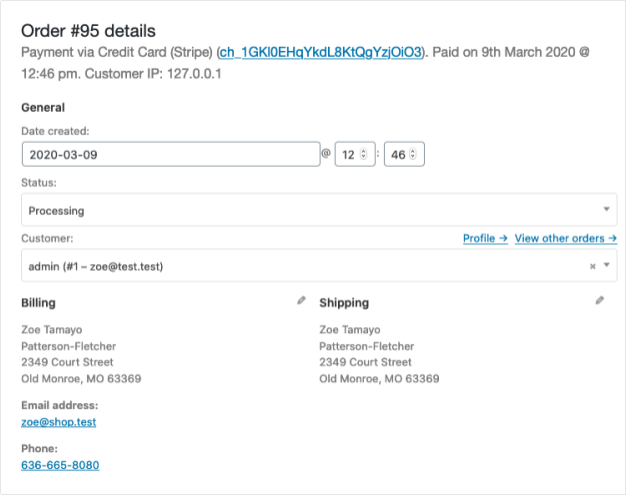
Editing Order Details
Most of the details in this section can be updated and/or changes.
ŌŚÅ┬Ā┬Ā┬Ā┬Ā┬Ā┬Ā To change the date and time, use the dropdown date selector and the quantity selectors for the time.
ŌŚÅ┬Ā┬Ā┬Ā┬Ā┬Ā┬Ā To change the status, choose the right status in the dropdown.
ŌŚÅ┬Ā┬Ā┬Ā┬Ā┬Ā┬Ā To change the customer, select the current customer and search for the new customer.
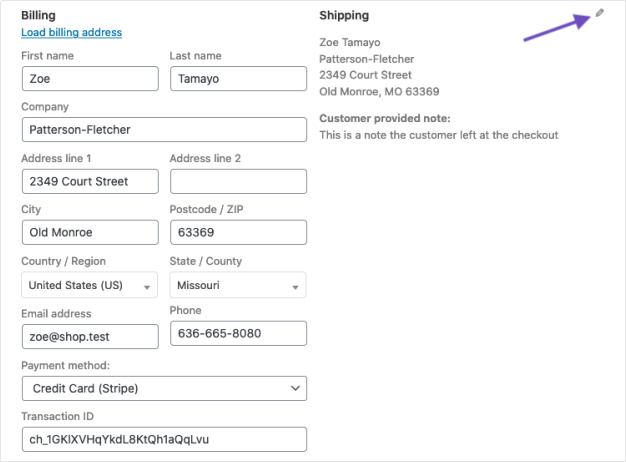
Under ŌĆ£BillingŌĆØ and ŌĆ£ShippingŌĆØ, several other details can be changed. In order to do so, select the pencil icon next to each of them.
ŌŚÅ┬Ā┬Ā┬Ā┬Ā┬Ā┬Ā Under ŌĆ£BillingŌĆØ, the following things can be changed:
ŌŚŗ┬Ā┬Ā┬Ā┬Ā┬Ā┬Ā Billing address ŌĆö this can also be loaded from the customerŌĆÖs profile by selecting ŌĆ£Load billing addressŌĆØ
ŌŚŗ┬Ā┬Ā┬Ā┬Ā┬Ā┬Ā Email
ŌŚŗ┬Ā┬Ā┬Ā┬Ā┬Ā┬Ā Phone number
ŌŚŗ┬Ā┬Ā┬Ā┬Ā┬Ā┬Ā Payment method and details
ŌŚÅ┬Ā┬Ā┬Ā┬Ā┬Ā┬Ā Under ŌĆ£ShippingŌĆØ, the following things can be changed:
ŌŚŗ┬Ā┬Ā┬Ā┬Ā┬Ā┬Ā Shipping address ŌĆö this can also be loaded from the customerŌĆÖs profile or copied from the billing address
ŌŚŗ┬Ā┬Ā┬Ā┬Ā┬Ā┬Ā Customer provided note
Once youŌĆÖve made the necessary changes, select Update to update the order.
Order Items and Totals
Viewing Order Items
The next panel on the order page is the Order Items panel. This contains the product items, the shipping details, and the order summary.
ŌŚÅ┬Ā┬Ā┬Ā┬Ā┬Ā┬Ā Each product item row lists:
ŌŚŗ┬Ā┬Ā┬Ā┬Ā┬Ā┬Ā Product image
ŌŚŗ┬Ā┬Ā┬Ā┬Ā┬Ā┬Ā Product name
ŌŚŗ┬Ā┬Ā┬Ā┬Ā┬Ā┬Ā Single product Cost
ŌŚŗ┬Ā┬Ā┬Ā┬Ā┬Ā┬Ā Quantity
ŌŚŗ┬Ā┬Ā┬Ā┬Ā┬Ā┬Ā Total (Cost x Quantity, with discounts taken into consideration)
ŌŚŗ┬Ā┬Ā┬Ā┬Ā┬Ā┬Ā Taxes
ŌŚÅ┬Ā┬Ā┬Ā┬Ā┬Ā┬Ā Below that, the shipping details are displayed. This will include:
ŌŚŗ┬Ā┬Ā┬Ā┬Ā┬Ā┬Ā Shipping method
ŌŚŗ┬Ā┬Ā┬Ā┬Ā┬Ā┬Ā Boxed items
ŌŚŗ┬Ā┬Ā┬Ā┬Ā┬Ā┬Ā Total cost
ŌŚŗ┬Ā┬Ā┬Ā┬Ā┬Ā┬Ā Taxes
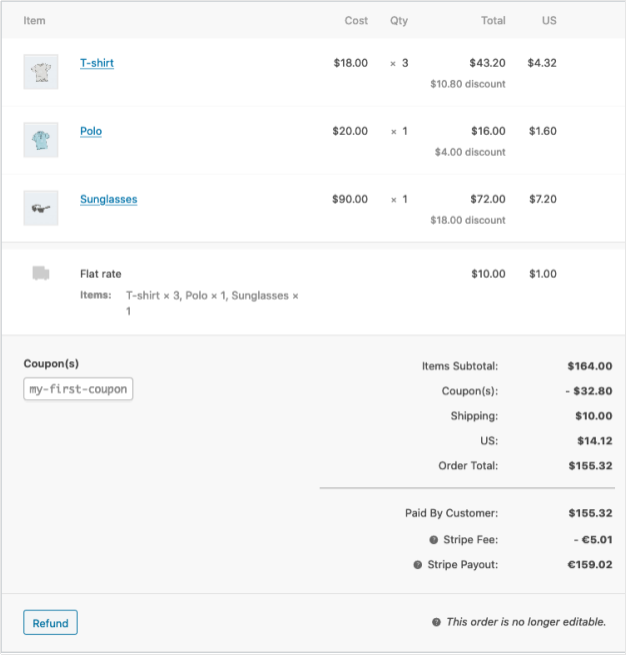
ŌŚÅ┬Ā┬Ā┬Ā┬Ā┬Ā┬Ā The last section contains an overview of the order costs. This section will change if an order is refunded. By default, it will include:
ŌŚŗ┬Ā┬Ā┬Ā┬Ā┬Ā┬Ā Items subtotal ŌĆö cost excluding tax
ŌŚŗ┬Ā┬Ā┬Ā┬Ā┬Ā┬Ā Coupon(s) ŌĆö amount deducted based on the use of coupons; the coupons used are displayed left in this section
ŌŚŗ┬Ā┬Ā┬Ā┬Ā┬Ā┬Ā Shipping ŌĆö the shipping cost for the order
ŌŚŗ┬Ā┬Ā┬Ā┬Ā┬Ā┬Ā Taxes ŌĆö the amount of taxes for the whole order; this will be replaced by the tax code applied to the order
ŌŚŗ┬Ā┬Ā┬Ā┬Ā┬Ā┬Ā Order total ŌĆö the total of the above costs
ŌŚŗ┬Ā┬Ā┬Ā┬Ā┬Ā┬Ā Finally, below the line, an overview of what is paid and the fees taken by payment gateways
Editing or Adding Order Items
Apart from refunding, order items can not be edited, unless the order status is ŌĆ£Pending paymentŌĆØ, or ŌĆ£On hold.ŌĆØ
Product items. Select the pencil icon next to a product line to edit.
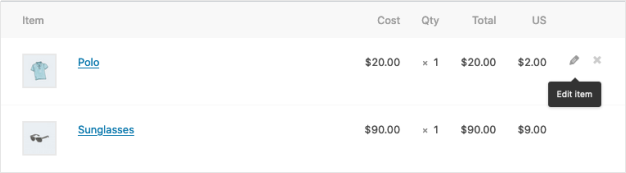
The following product items can be edited:
ŌŚÅ┬Ā┬Ā┬Ā┬Ā┬Ā┬Ā Add Meta ŌĆö Add and remove meta to change product variable options.
ŌŚÅ┬Ā┬Ā┬Ā┬Ā┬Ā┬Ā Quantity ŌĆö Number of items the customer is purchasing.
ŌŚÅ┬Ā┬Ā┬Ā┬Ā┬Ā┬Ā Total ŌĆö Line price and line tax before pre-tax discounts.
ŌŚÅ┬Ā┬Ā┬Ā┬Ā┬Ā┬Ā Tax ŌĆö Tax cost. For example, if a customer is tax-exempt you may want to remove the taxes.
Other actions. Next, you can do four actions at the bottom of this window:

ŌŚÅ┬Ā┬Ā┬Ā┬Ā┬Ā┬Ā Add item(s) ŌĆö this will show you six new options:
ŌŚŗ┬Ā┬Ā┬Ā┬Ā┬Ā┬Ā Add product(s) ŌĆö Add additional products to the order.
ŌŚŗ┬Ā┬Ā┬Ā┬Ā┬Ā┬Ā Add fee ŌĆö Add an additional fee, such as gift wrapping.
ŌŚŗ┬Ā┬Ā┬Ā┬Ā┬Ā┬Ā Add shipping ŌĆö Add a shipping cost. When youŌĆÖve done this, select the pencil icon to update the name, the method, the cost, and the tax.
ŌŚŗ┬Ā┬Ā┬Ā┬Ā┬Ā┬Ā Add tax ŌĆö Add an additional tax code to every section in the order.
ŌŚŗ┬Ā┬Ā┬Ā┬Ā┬Ā┬Ā Cancel ŌĆö Cancel if you do not want to make any changes.
ŌŚŗ┬Ā┬Ā┬Ā┬Ā┬Ā┬Ā Save ŌĆö Save once the changes are made.
ŌŚÅ┬Ā┬Ā┬Ā┬Ā┬Ā┬Ā Once youŌĆÖve done this, select Recalculate to make sure all the changes are reflected in the order totals.

ŌŚÅ┬Ā┬Ā┬Ā┬Ā┬Ā┬Ā Apply coupon ŌĆö If your customer forgot to add the coupon could or you want to reward the customer before they pay, selecting this option will show a modal that allows you to apply a coupon code.
ŌŚÅ┬Ā┬Ā┬Ā┬Ā┬Ā┬Ā Refund ŌĆö to refund the customer. For more information about Manual and Automatic Refunds, see WooCommerce Refunds.
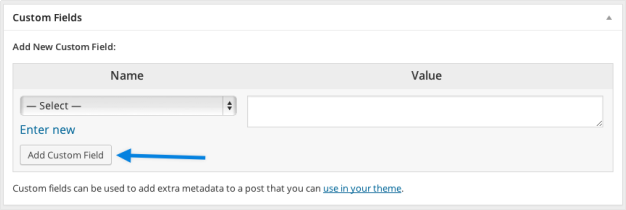
Custom Fields
To add custom meta fields, use the Custom Fields metabox:
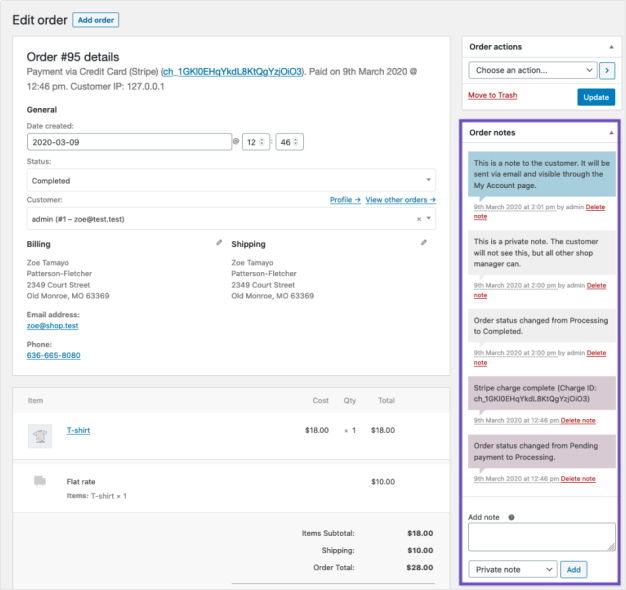
Order Notes
The Order Notes panel displays notes attached to the order and can be used for storing event details, such as payment results or reducing stock levels, or adding notes to the order for customers to view. Some payment gateways also add notes for debugging.
The following note types are possible:
ŌŚÅ┬Ā┬Ā┬Ā┬Ā┬Ā┬Ā Purple: System status notices, such as payment gateway details.
ŌŚÅ┬Ā┬Ā┬Ā┬Ā┬Ā┬Ā Grey: General status updates, such as status changes or private notes. Customers do not see these notes but may receive notification of them, e.g., when the status changes from processing to completed, an email may be sent (depending on your settings).
ŌŚÅ┬Ā┬Ā┬Ā┬Ā┬Ā┬Ā Blue: Notes to the customer. Customers receive notes via email but can view them by viewing an order, or using the WooCommerce order tracking page.
Notes can be a powerful tool for communicating with customers or other store managers. Need to add a tracking number for shipping? Is stock delayed? Add a customer note, and they are automatically notified.
To add a note,
ŌŚÅ┬Ā┬Ā┬Ā┬Ā┬Ā┬Ā Use the textarea to add the content of the note.
ŌŚÅ┬Ā┬Ā┬Ā┬Ā┬Ā┬Ā Select Private note or Note to customer in the dropdown.
ŌŚÅ┬Ā┬Ā┬Ā┬Ā┬Ā┬Ā Select Add.
┬Ā
┬Ā
┬Ā
┬Ā
┬Ā
Troubleshooting
Understanding Order Statuses in Relation to Payment Gateways
┬Ā
|
STATUS |
DESCRIPTION |
PAYMENT GATEWAY COMMENTS |
|
ON HOLD |
Awaiting payment ŌĆō stock is reduced, but you need to confirm payment |
Usually seen with payment methods when you need to manually confirm, such as BACS (bank transfer) or cheque. ┬Ā YouŌĆÖll also see this when the gateway is set to authorize instead of capture a charge: the shop owner will need to manually switch the status to processing. |
|
PENDING |
Order received (unpaid). |
Most gateways will report back and set the order status to Processing (payment successful) or Failed (payment unsuccessful).┬Ā If the shop never receives either signal, it keeps the status on Pending. ┬Ā This tends to be a misconfiguration of payment notification URLs or a plugin conflict. |
|
PROCESSING |
Payment received and stock has been reduced- the order is awaiting fulfillment. All product orders require processing, except those with only products that are both digital and downloadable. |
If the payment has been successful and the order does not contain Digital or Downloadable products, the order will be set to Processing. ┬Ā This is the shop owner or warehouseŌĆÖs cue to ship the order and manually mark it as completed. |
|
COMPLETED |
Order fulfilled and complete ŌĆō requires no further action |
These generally arenŌĆÖt interesting because everything has gone correctly. |
|
FAILED |
Payment failed or was declined (unpaid). |
The order can be manually canceled, but this status can come up if the payment window has expired. It can happen for a few reasons: ŌŚÅ┬Ā┬Ā┬Ā┬Ā┬Ā┬Ā┬Ā order was abandoned┬Ā before payment was completeThe hold stock window expired without a response ŌŚÅ┬Ā┬Ā┬Ā┬Ā┬Ā┬Ā┬Ā Same reasons as Pending |
|
AUTHENTICATION REQUIRED |
Customer must complete requirements for SCA. |
It can occur when: ŌŚÅ┬Ā┬Ā┬Ā┬Ā┬Ā┬Ā┬Ā a new customer makes a purchase ŌŚÅ┬Ā┬Ā┬Ā┬Ā┬Ā┬Ā┬Ā an existing subscription renews |
┬Ā
┬Ā
WooCommerce Reports
To view them, go to: WooCommerce > Reports.
Orders
Orders allow you to view gross and net sales volume and totals, as well as top sellers, top freebies, top earners, and product downloads. Sub-sections are shown below.

Note: By default, orders marked Processing, On Hold and Completed are counted as sales.
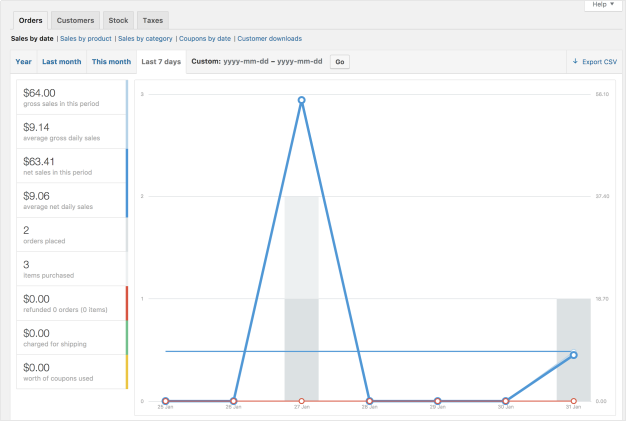
Sales by date
The Orders tab starts with Sales by date. This gives you an idea of the current performance via a sales graph and a few way ways to drill down into data. By year, last month, this month, last 7 days, and a custom date range.
The sales graph itself shows the number of gross sales plotted on a light blue line, the net sales plotted in dark blue, the shipping amount plotted in green, refunds plotted in red, and coupon values redeemed in orange. Hovering over a point will give you the exact figure.
Sales by product
The sales per product section shows sales per day in a given range, similarly to the overview section:
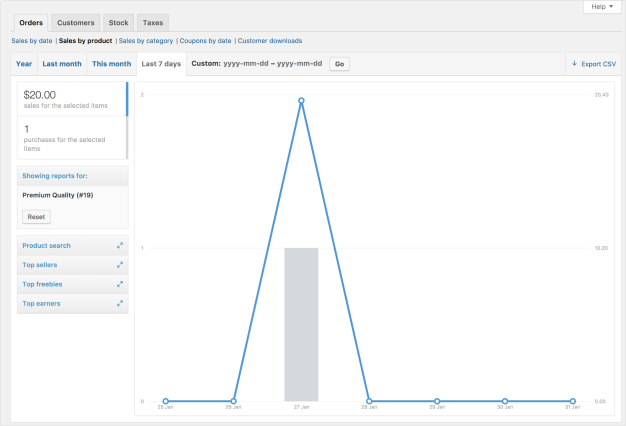
You can select any product from your store to view sales data, and again drill down into by year, last month, this month, last 7 days, and custom.

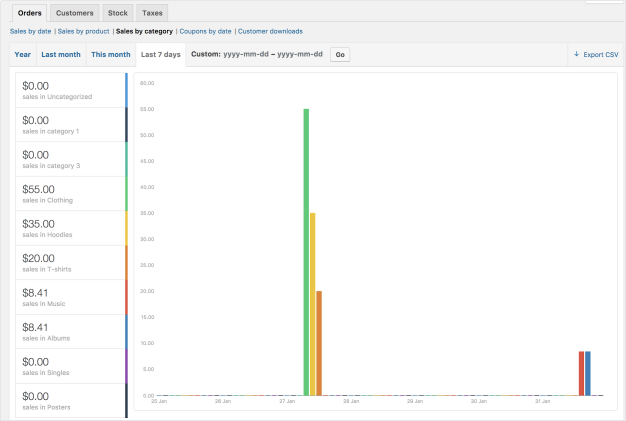
Sales by category
You can also view sales numbers by category.
ŌŚÅ┬Ā┬Ā┬Ā┬Ā┬Ā┬Ā In the Categories widget, select the categories you want to review. (Or select ŌĆ£AllŌĆØ)
ŌŚÅ┬Ā┬Ā┬Ā┬Ā┬Ā┬Ā Then, select ŌĆ£ShowŌĆØ
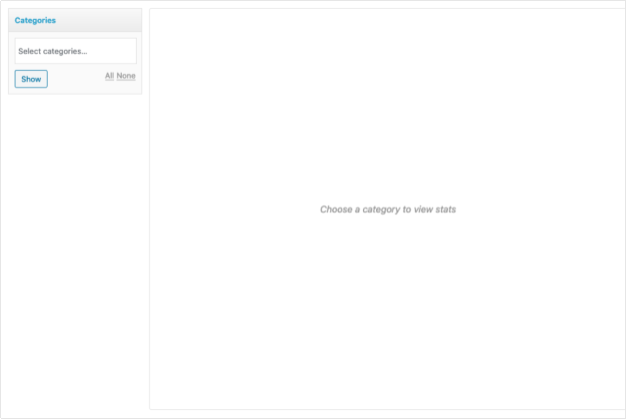
You will now see the categories youŌĆÖve selected and their sales report.
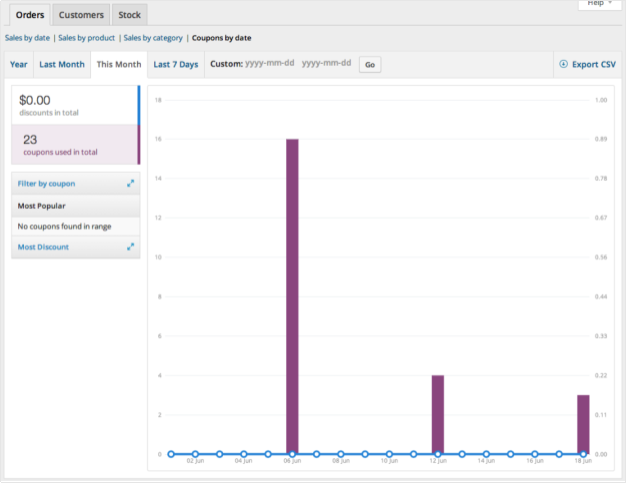
Coupons by date
Similar to the previous sections, coupons by date shows discounts in total and number of coupons used, plus provides the ability to filter by coupon, view the most popular coupons, and coupons giving the most discounts.
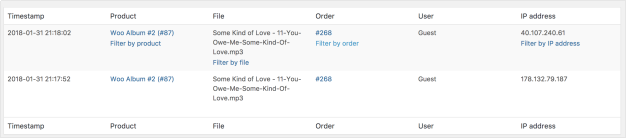
Customer downloads
Downloads have unique IDs, enabling them to be tracked and logged, and making it possible to view when it was downloaded, which products and the file name, on what order (clickable link), and where the customer is located via IP address.

ItŌĆÖs also possible to filter downloads by hovering over Product, Order or IP address.
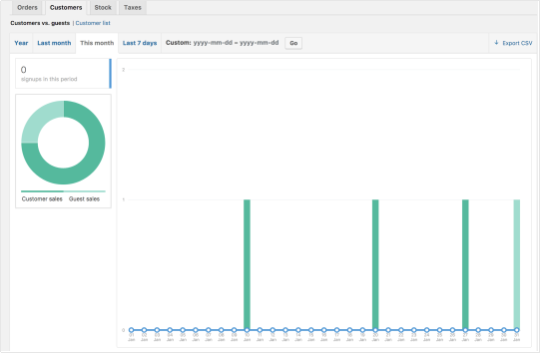
Customers
The Customers tab allows you to view reports for Customers vs. Guests and Customer List with options to further sort by year, last month, this month, last 7 days, and custom.
ŌŚÅ┬Ā┬Ā┬Ā┬Ā┬Ā┬Ā In Customers vs. Guests, customers are paying users who register on your website.
ŌŚÅ┬Ā┬Ā┬Ā┬Ā┬Ā┬Ā Customer List only shows registered users.
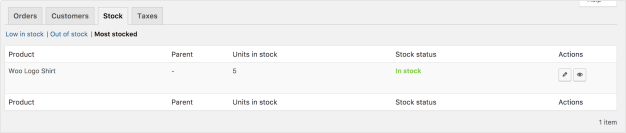
Stock
Stock lists your low in stock, out of stock items, and most stocked products.
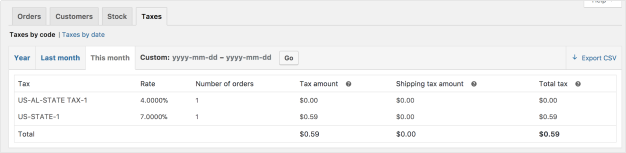
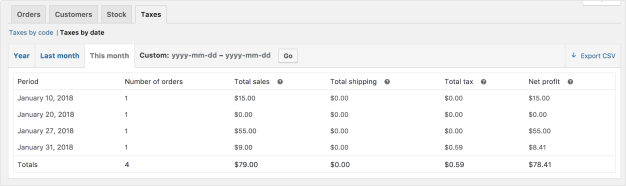
Taxes
The reports for Taxes allows you to view Taxes by code (state) and Taxes by date. by year, last month, this month and custom dates you enter.
┬Ā
┬Ā
┬Ā
┬Ā
┬Ā
┬Ā
Export CSV
All reports besides the stock one have the option to export to CSV.
ŌŚÅ┬Ā┬Ā┬Ā┬Ā┬Ā┬Ā Select Export CSV
ŌŚÅ┬Ā┬Ā┬Ā┬Ā┬Ā┬Ā Save or view the file

┬Ā
┬Ā
┬Ā